The Obsidian Canvas: A Tale of Black Cocoa Sourdough and the Art of the Score
The kitchen, usually a bright and airy space filled with the comforting aroma of my sourdough starter and warm flour, held a different kind of magic that day. It was a magic tinged with the deep, mysterious hue of night, a magic born from the unlikely marriage of sourdough and black cocoa.
My journey into the realm of black cocoa sourdough wasn’t a sudden plunge into darkness, but rather a slow, seductive whisper. It began with a simple curiosity, a fleeting thought sparked by a picture I’d seen online – a loaf of bread so intensely dark, it seemed to absorb the very light around it, yet adorned with delicate, contrasting scores that spoke of hidden depths.
For years, my hands had danced with the familiar rhythm of sourdough. The gentle coaxing of the starter, the patient folding of the dough, the anticipation of the oven spring – these were the rituals that grounded me, the silent language I shared with the ancient grain. But there was a yearning for something more, a desire to push beyond the familiar golden crust and explore the uncharted territories of flavor and aesthetics.
Black cocoa. The name itself evoked a sense of drama, of intense, unsweetened chocolate. I’d used it in brownies and cakes, marveling at its ability to impart a deep, almost obsidian color and a nuanced, sophisticated chocolate note without overwhelming sweetness. The thought of weaving this enigmatic ingredient into the heart of a sourdough loaf was both intriguing and slightly audacious. Would it work? Would the delicate balance of sourdough flavors be lost in the darkness?
The initial experiments were tentative. A small amount of black cocoa added to my regular sourdough recipe. The dough took on a subtle greyish hue, and the baked loaf had a whisper of cocoa, more of an earthy undertone than a distinct chocolate flavor. It was interesting, but not the dramatic transformation I had envisioned.
Then came the realization: to truly embrace the darkness, the black cocoa needed to be more than just an addition; it needed to be an integral part of the dough’s very being. This led me to the transformative technique of lamination, a method I had previously used primarily for incorporating butter into croissants and pastries. The idea of laminating black cocoa into the sourdough, folding it layer upon delicate layer, felt like unveiling a secret, painting the canvas of the dough from within.
The Gentle Embrace of Lamination
Lamination, at its heart, is an act of gentle persuasion. It’s about coaxing the dough into thin, expansive sheets, creating countless layers that contribute to a light, airy, and beautifully structured crumb. In the context of black cocoa sourdough, it becomes a way to weave the dark powder throughout the dough, not just as a superficial addition, but as an intrinsic part of its fabric.
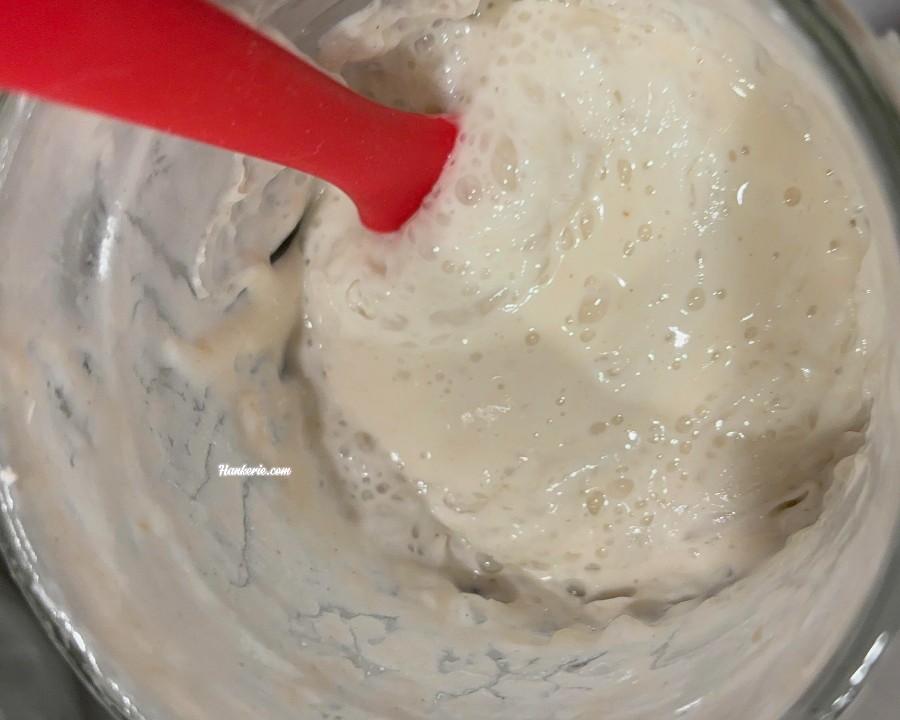
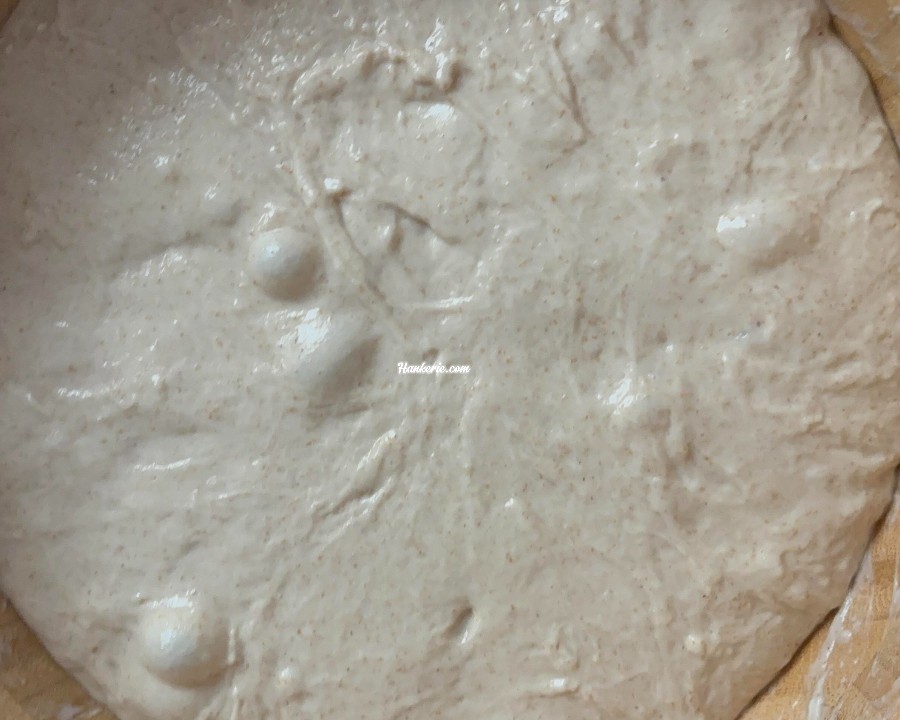
The day I decided to truly commit to the black cocoa lamination, the air in my kitchen felt charged with a sense of anticipation. My starter, bubbly and active, sat patiently in its jar, a testament to the weeks of care and feeding. The bulk-fermented dough, smooth and elastic, rested in its bowl, ready for its transformation.
I lightly wet my hands and the cool surface of my countertop, a trick I’d learned to prevent the sticky dough from clinging stubbornly. With gentle hands, I coaxed the dough from the bowl, its soft sigh a familiar comfort. Stretching it slowly and deliberately, I aimed for a thin rectangle, mindful not to tear the delicate network of gluten that had developed during the long fermentation. This stretching, this gentle manipulation, felt like a conversation with the dough, a silent understanding between my hands and the living organism beneath them.
Once the dough was stretched, I wanted to add another layer of flavor and texture, I reached for two small bowls filled with treasures: dried cranberries, their ruby red a stark contrast to the cocoa, and a mix of flax and poppy seeds, their nutty earthiness a subtle counterpoint to the anticipated richness. I sprinkled these inclusions evenly over the cocoa-dusted area, imagining the bursts of sweetness and the delicate crunch they would bring to each slice.
Then came the folding, the heart of the lamination process. Taking the un-seeded third of the dough, I folded it gently over the middle third, like closing the first page of a dark and intriguing book. The remaining seeded and cocoa-dusted third was then folded over the top, sealing the layers within. The once-flat expanse of dough now held within it the promise of intricate patterns and hidden flavors.
The final step of this initial manipulation was a gentle coil fold. Patting the dough down lightly to redistribute the inclusions and cocoa, I lifted it from the middle, allowing the ends to stretch under its own weight before folding them underneath. This was repeated on all four sides, building strength and structure within the laminated dough, let it do the final bulk fermentation until the dough feel jiggly.
The next step was shaping. Handling the cold dough was a dream. It was firm and elastic, holding its shape beautifully. With gentle, practiced movements, I pre-shaped the laminated dough into a round, allowing it to rest briefly on the counter, covered with a damp cloth. This short rest allowed the gluten to relax, making the final shaping easier.
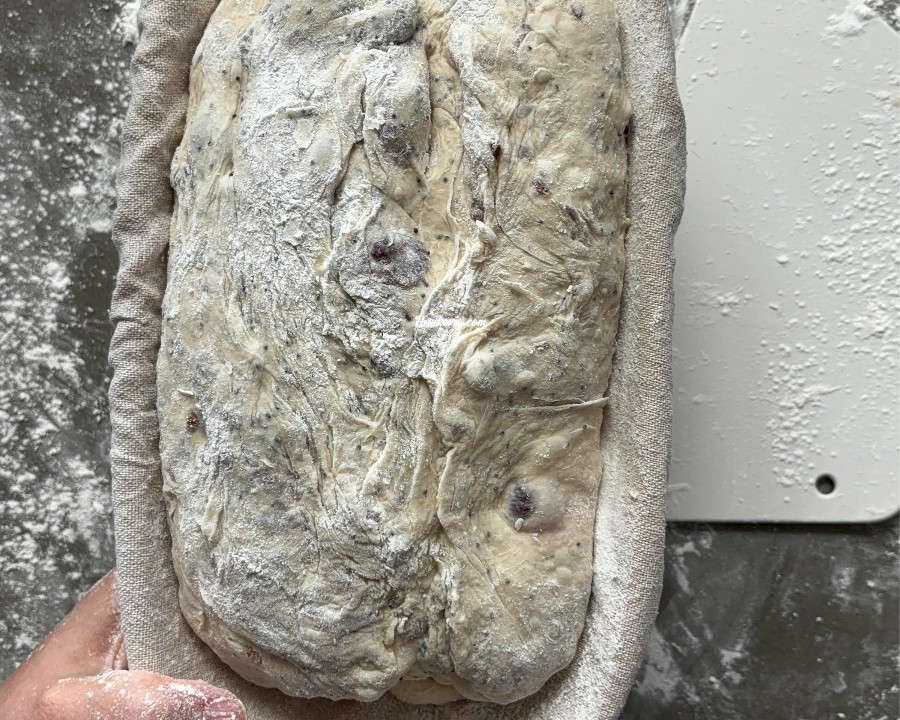
For this particular loaf, I decided on a batard shape, an oval that would provide a beautiful canvas for the scoring design I had in mind. With deft hands, I performed the final shaping, creating a smooth, taut surface that would be perfect for the intricate patterns I envisioned.
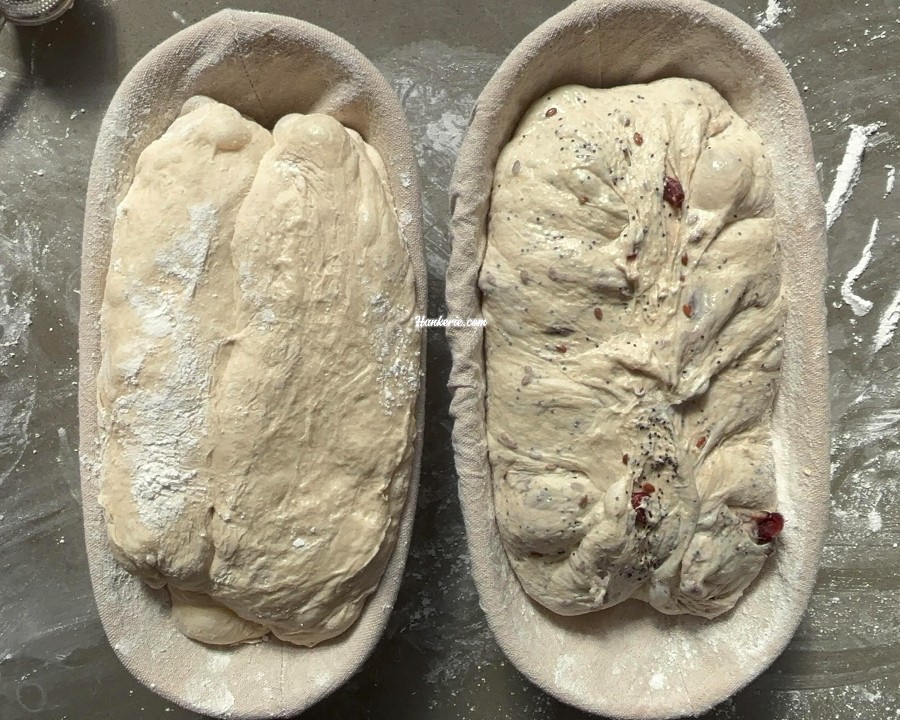
The banneton, generously dusted with rice flour – my secret weapon against sticking – awaited its precious cargo. Gently, I placed the shaped batard seam-side up into the basket. This seemingly small detail was crucial. By proofing seam-side up, the smooth, unbroken surface would be facing upwards when the loaf was turned out, providing the perfect obsidian canvas for the art of scoring.
Covered snugly, the banneton returned to the refrigerator for a final cold proof. This additional rest would further firm the dough, ensuring clean, defined scores.
The Slumber and the Awakening
The overnight cold proof is a crucial stage in sourdough baking, a period of slow fermentation that allows flavors to deepen and the dough to firm up, making it easier to handle and score.
The next morning, the kitchen felt different. The cranberries peeked out like tiny jewels, and the seeds added a subtle texture to the surface.
The aroma was intriguing – the familiar tang of sourdough, now intertwined with a subtle, earthy hint of cocoa. It wasn’t overwhelmingly chocolatey, but rather a deep, complex scent that hinted at the unique flavor profile to come.
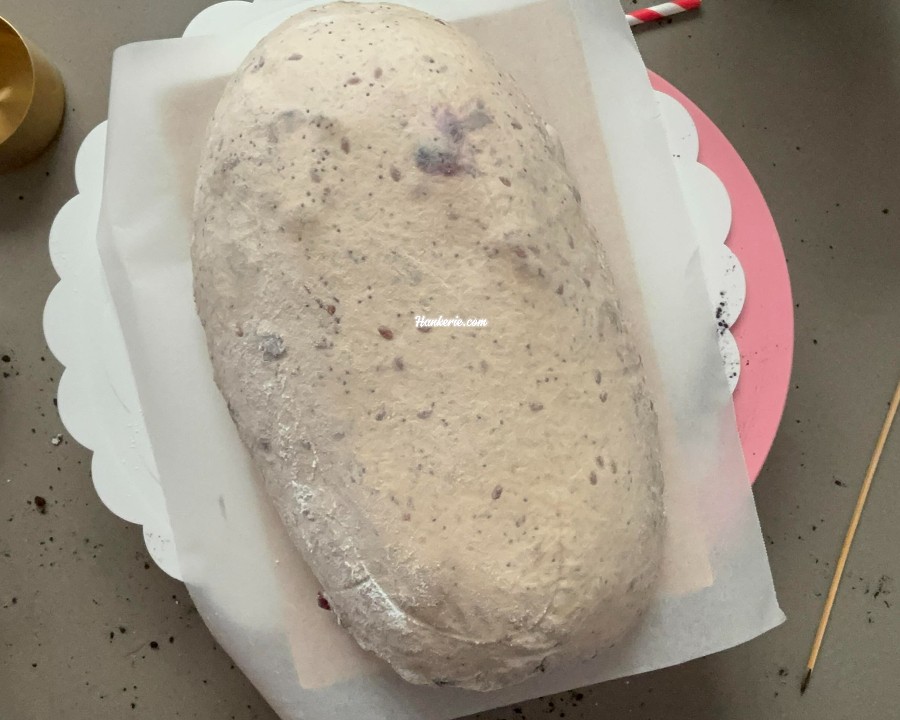
During this time, my mind began to wander, sketching out the patterns that would soon adorn the dark surface of the loaf.
The Ritual of Preparation
I gathered my tools: a razor-sharp lame with a fresh blade, a slender bamboo skewer, a small bowl of black cocoa powder, and a fine-mesh sieve. Each tool had its purpose, each played a vital role in the artistic process that was about to unfold.
A piece of parchment paper, large enough to cradle the loaf and line my baking tray, was carefully cut and laid out. The Dutch oven, my trusty vessel for achieving that perfect crust, sat nearby, preheating in the oven, its baking tray absorbing the intense heat.
The moment of truth arrived. Gently, I inverted the cold-proofed dough from the banneton onto the parchment paper. The reveal was always a moment of quiet satisfaction. The smooth, unbroken surface, now a deep, almost black canvas dusted with a light coating of rice flour from the banneton, awaited my artistic touch.
This was where the second layer of darkness came in. Using the fine-mesh sieve, I generously and evenly coated the entire top surface of the batard with black cocoa powder. The fine particles of the dark powder clung to the slightly damp surface, creating a velvety, intensely black canvas. The contrast between this deep, matte black and the lighter crumb beneath would make the scores truly pop, like lines drawn in charcoal on a dark slate.
The aroma intensified, the earthy cocoa notes now more pronounced, mingling with the subtle tang of the sourdough. It was a scent that spoke of both richness and depth, a promise of the complex flavors that awaited within.
With the obsidian canvas prepared, it was time to begin the art of scoring.
The Language of the Score – The Wheat Stalk Design
Scoring sourdough is more than just making cuts in the dough to control its expansion in the oven. It’s a form of artistic expression, a way to communicate with the loaf, to guide its bloom, and to leave your unique signature on its surface. On the dark canvas of black cocoa sourdough, the scores take on a dramatic elegance, the lighter dough revealed beneath creating striking visual patterns.
For this particular loaf, I had chosen a design that felt both organic and intricate: the wheat stalk. It was a design that spoke of the grain from which the bread originated, a subtle nod to the alchemy that transforms simple flour and water into a life-sustaining food.
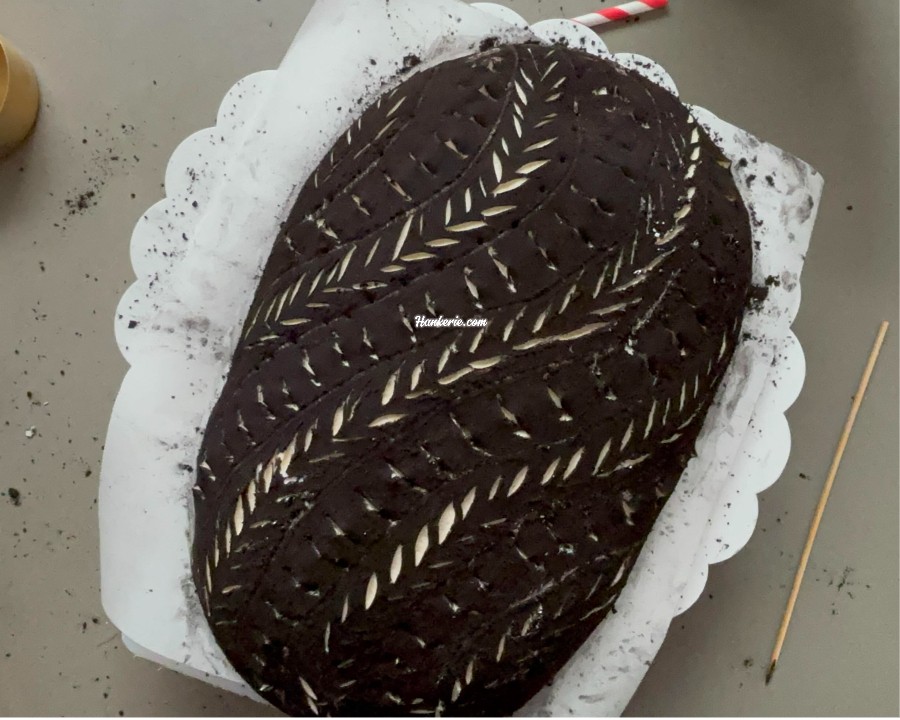
The first step was to sketch the design lightly onto the cocoa-dusted surface using the slender bamboo skewer. This was a delicate process, requiring a light touch to avoid deflating the dough. I envisioned several wheat stalks, their central stems running roughly parallel along the length of the batard. Then, branching off each stem, I sketched small ‘V’ shapes or chevrons, representing the individual grains of wheat. I experimented with different arrangements – some stalks overlapping slightly, others radiating outwards – until I was satisfied with the overall composition. These skewer lines were merely guidelines, faint whispers on the dark surface, but they would serve as the roadmap for my scoring blade.
With the design sketched, I reached for my lame, ensuring it held a fresh, razor-sharp blade. The sharpness was crucial for creating clean, precise cuts that would bloom beautifully in the oven. Holding the lame at a shallow angle, about 30 degrees to the surface of the dough, I began to score the individual wheat grains. Following the light skewer lines, I made small, decisive, shallow cuts for each ‘V’ shape. The dark cocoa parted cleanly, revealing the slightly lighter dough beneath, creating delicate, contrasting lines. This required patience and a steady hand, each cut a deliberate stroke in this edible artwork.
Once the wheat grains were scored, it was time for the main expansion score. This was the crucial cut that would allow the loaf to expand evenly in the oven, preventing unwanted tears and creating a beautiful “ear,” that characteristic lift along the score line. I planned a deep ‘S’ shape that would run down the length of the loaf, weaving gracefully through the wheat stalks.
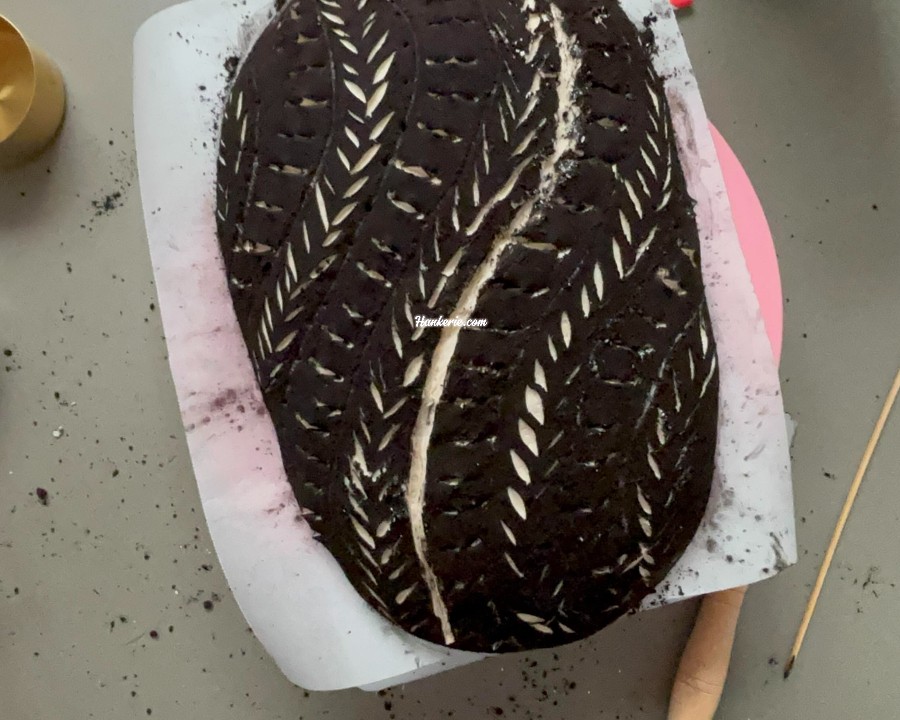
Holding the lame at a slightly steeper angle, around 45 degrees, I took a deep breath and made a confident, fluid cut. The sharp blade sliced through the cocoa and into the heart of the dough, creating a visible opening. One good, confident slash is usually all it takes, but I gently went over a small section where I felt the initial cut wasn’t quite deep enough.
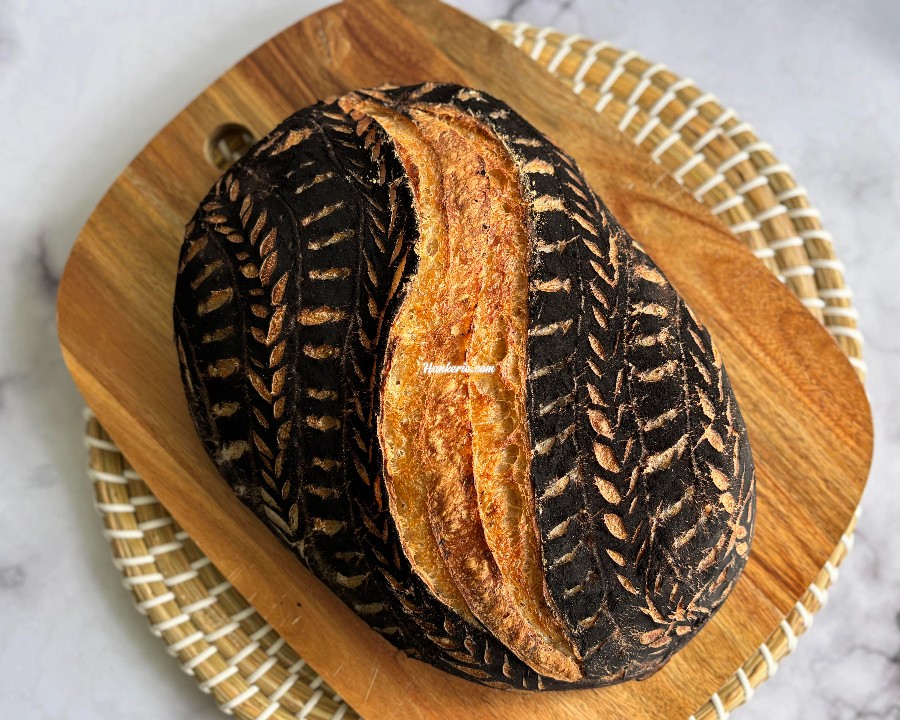
The contrast was now even more striking. The deep, dark cocoa surface was adorned with delicate, lighter lines of the wheat grains and the bold, curving slash of the main expansion score. It was a visual representation of the tension within the dough, the energy waiting to be unleashed by the heat of the oven.
As I carefully transferred the scored loaf on its parchment paper into the preheated baking tray and placed the ice underneath tray, I felt a familiar sense of anticipation. The transformation was about to enter its final stage, the heat of the oven would work its magic, and the obsidian canvas would rise and bloom, revealing the artistry of the score.
The Symphony of Heat and Steam
The initial moments with creating the steam using the ice in open bake are crucial for sourdough. The trapped steam creates a humid environment that allows the crust to remain soft and extensible for longer, promoting maximum oven spring and the beautiful bloom of the scores.
As the minutes ticked by, the aroma emanating from the oven began to evolve. The earthy cocoa notes deepened, mingling with the developing fragrance of baking bread. I resisted the urge to peek, knowing that patience was key to achieving that perfect crust and open crumb.
The scores had started to open, the lighter dough pushing through the dark cocoa, creating a striking contrast. The wheat stalks were beginning to take shape, the individual grains becoming more defined. The main expansion score had opened beautifully, hinting at the airy interior within.
At this point, I lowered the oven temperature and allowed the loaf to bake uncovered for the remaining time. This allowed the crust to develop its characteristic color and crispness. The kitchen filled with the intoxicating aroma of freshly baked sourdough, now with a subtle, intriguing hint of cocoa.
The final moments of baking were a silent vigil. I watched through the oven window as the loaf continued to rise and the crust deepened to a rich, dark brown, the black cocoa lending it an almost burnished quality. The scores continued to bloom, the wheat stalk design becoming more pronounced, a testament to the careful sketching and precise cuts.
Finally, the internal temperature reached the desired point, and it was time to take the loaf out of the oven. The weight of it in my hands was satisfying, a promise of the airy interior. The crust was firm and resonant, and the aroma was intoxicating.
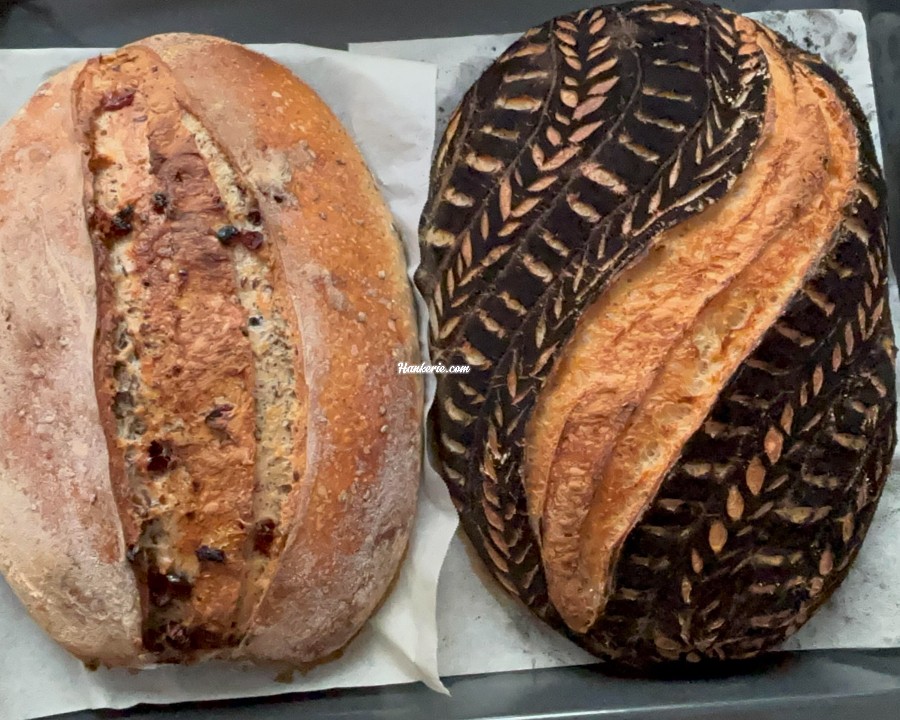
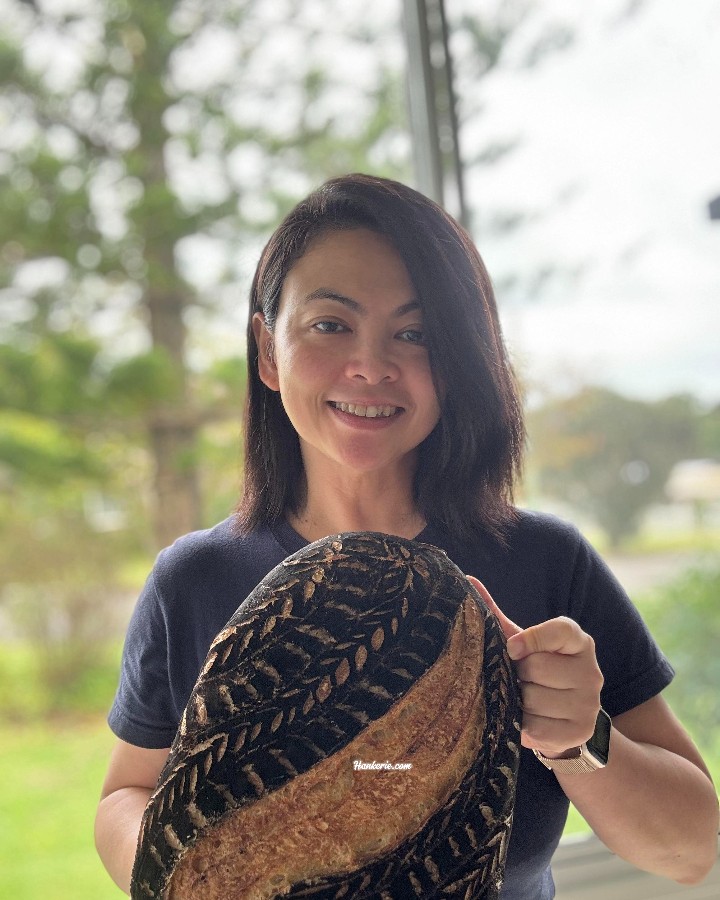
The obsidian canvas had risen, and the language of the score had been beautifully translated by the heat of the oven. The wheat stalk design stood out in elegant relief against the dark background, a testament to the simple beauty of combining art and craft.
Beyond the Wheat – Exploring Other Scores on the Dark Canvas
The wheat stalk is just one of the many ways to adorn the dramatic elegance of black cocoa sourdough. The dark canvas lends itself beautifully to a variety of scoring patterns, each creating a unique visual impact. Here are a few other designs to explore:
The Simple Slash: Sometimes, less is more. A single, deep, confident slash down the length of the loaf can create a dramatic “ear” and a beautiful, rustic appearance on the dark cocoa surface. The contrast between the dark crust and the lighter interior revealed by the slash is particularly striking.
The Double Parallel: Two parallel slashes, running side-by-side along the length of the loaf, can create a more structured and elegant look. Experiment with the depth and angle of the slashes to achieve different effects.
The Cross: A simple cross scored into the top of a round loaf is a classic for a reason. On the black cocoa, the intersecting lines create a bold and graphic design.
The Leaf: Inspired by nature, a leaf pattern can be created with a series of overlapping diagonal scores branching off a central spine. This design looks particularly stunning on the dark background, the lighter lines creating the delicate veins of the leaf.
The Spiral: For a more dynamic and artistic look, try scoring a spiral pattern on the top of the loaf. Start in the center and work your way outwards in a continuous, curving line.
Tips for Scoring Black Cocoa Sourdough:
- Generous Dusting: Ensure an even and generous coating of black cocoa powder for maximum contrast.
- Sharp Blade: A fresh, sharp lame is essential for clean, precise cuts.
- Confident Cuts: Make deliberate and confident slashes. Hesitation can lead to ragged scores.
- Vary Depth and Angle: Experiment with the depth and angle of your cuts to achieve different effects in the oven spring. Shallower cuts tend to create more surface patterns, while deeper cuts encourage a more dramatic “ear.”
- Light Touch for Surface Designs: For delicate surface patterns, use a light touch with the lame or a sharp knife.
- Practice Makes Perfect: Don’t be discouraged if your first attempts aren’t perfect. Scoring is a skill that improves with practice.
The Taste of Darkness and Light
The visual drama of black cocoa sourdough is only half the story. The flavor is equally intriguing, a subtle dance between the tang of the sourdough and the nuanced, unsweetened chocolate notes of the black cocoa.
The lamination process ensures that the cocoa is not just a superficial addition but is woven throughout the very fabric of the dough, imparting a delicate, earthy richness to every bite. The dried cranberries, scattered throughout, provide bursts of sweetness and a chewy texture that complements the slight bitterness of the cocoa. The flax and poppy seeds add a subtle nutty flavor and a pleasant crunch.
The crumb is often surprisingly light and airy, a testament to the lamination technique and the active sourdough starter. The contrast between the dark, almost black crust and the lighter interior is visually stunning, mirroring the interplay of flavors.
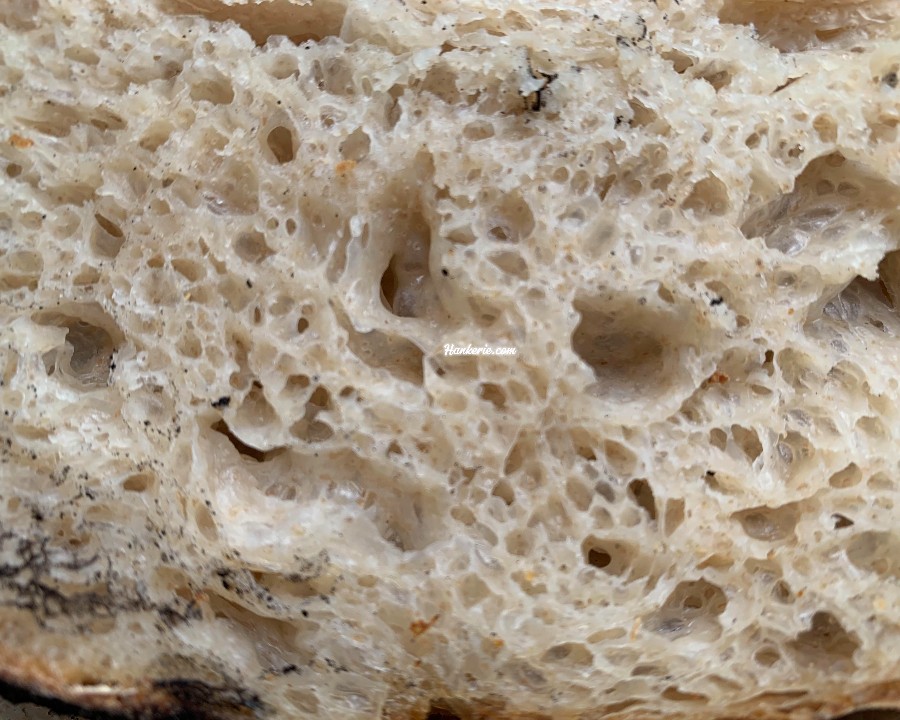
This is not a sweet, dessert-like bread. Instead, it offers a sophisticated and complex flavor profile that pairs beautifully with a variety of accompaniments. Imagine a slice toasted and served with a smear of creamy ricotta and a drizzle of honey, the sweetness of the honey highlighting the subtle cocoa notes. Or perhaps enjoyed alongside a hearty cheese board, the slight bitterness of the bread cutting through the richness of the cheese. It’s also surprisingly delicious simply on its own, the subtle flavors and textures unfolding with each chew.
Each time I embark on the journey of baking a black cocoa sourdough, I feel a renewed sense of wonder. The transformation of the pale dough into a canvas of deepest night is always a captivating sight. The delicate dance of the lame across its surface, guided by an intention to both control the oven spring and create a visually stunning pattern, is a moment of focused creativity. And the final reveal, the risen loaf adorned with its unique scoring, is a reward in itself.
This isn’t a bread that fades into the background. It demands attention, sparks conversation, and offers a sensory experience that goes beyond the ordinary. It’s a testament to the idea that food can be both nourishing and beautiful, a source of sustenance for both the body and the soul.
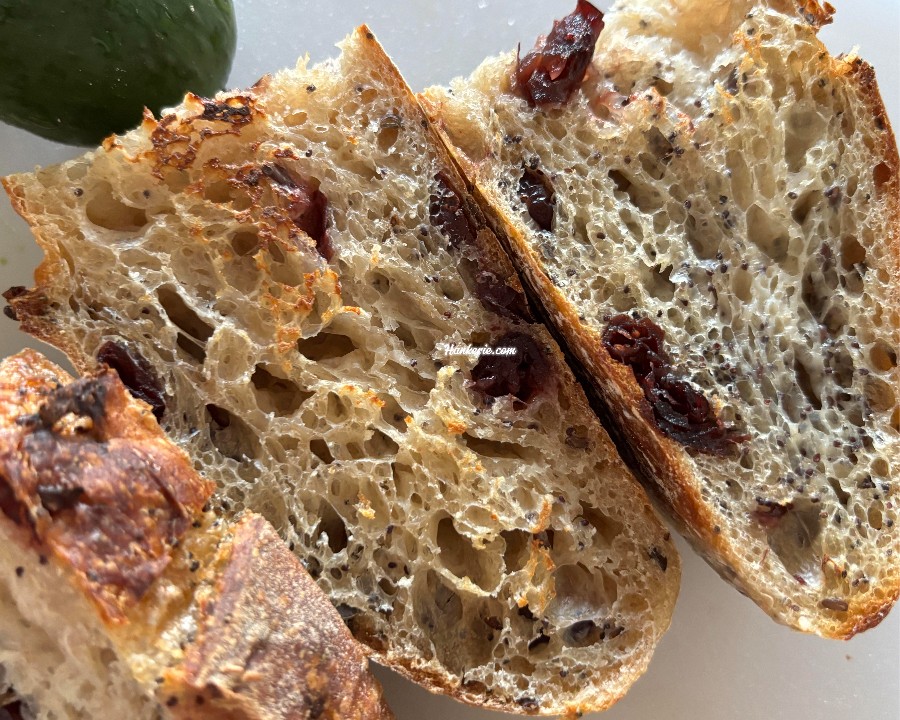
The beauty of the black cocoa sourdough also lies in its adaptability. The subtle cocoa flavor acts as a sophisticated backdrop, allowing the tang of the sourdough and the sweetness of the cranberries (or any other inclusions you choose) to shine through. It’s a bread that invites experimentation, encouraging bakers to play with different inclusions, flours, and scoring designs to create their own unique interpretations of this dramatic loaf.
And so, as we reach the final chapter of this culinary exploration, I hope I’ve inspired you to embrace the darkness and venture into the world of black cocoa sourdough. It’s a journey that promises both challenges and rewards, a chance to elevate your sourdough game and create loaves that are not just delicious, but also breathtaking works of art. The obsidian canvas awaits your touch, ready to be transformed by the language of your score.
Summary: Key Steps to Black Cocoa Sourdough Scoring
To help you on your journey of scoring the dramatic black cocoa sourdough, here’s a concise summary of the key steps we’ve explored:
- Prepare Your Canvas: After the final cold proof, gently invert your shaped dough onto parchment paper. Ensure a smooth, upward-facing surface.
- Dust Generously with Black Cocoa: Using a fine sieve, evenly and generously coat the entire top surface of the dough with black cocoa powder. Aim for a good, opaque layer to create a dark and striking background.
- Plan Your Design: Before you pick up your lame, visualize or even lightly sketch your desired scoring pattern onto the cocoa-dusted surface using a bamboo skewer or the tip of a knife. This helps guide your cuts.
- Use a Sharp Blade: A fresh, razor-sharp lame is crucial for clean and precise scores. Dull blades can drag and tear the dough, resulting in less defined patterns.
- Consider Your Angle and Depth:
- Shallow Angle (around 30 degrees): Ideal for creating surface patterns and delicate details like the wheat grains. These cuts typically don’t penetrate deeply into the dough.
- Steeper Angle (around 45 degrees): Best for creating the main expansion score (the “ear”). These cuts need to be deeper (around ¼ to ½ inch) to allow for proper oven spring.
- Make Confident Cuts: Execute your scores with deliberate and fluid motions. Hesitation can lead to uneven or ragged lines. Often, one clean slash is better than multiple hesitant ones.
- Vary Your Techniques: Experiment with different types of scores:
- Single Slash: For a dramatic ear and rustic look.
- Parallel Slashes: For a more structured and elegant appearance.
- Cross: A classic for round loaves.
- Intricate Patterns (like the wheat stalk or leaf): Requiring more detailed and shallower cuts.
- Spiral: For a dynamic and artistic effect.
- Observe the Bloom: As your loaf bakes, watch how the scores open and transform in the heat of the oven. This will give you valuable insights for future scoring endeavors.
- Practice and Experiment: Don’t be afraid to try different designs and techniques. Scoring is a skill that develops with practice. Each loaf is a new opportunity to learn and refine your artistry.
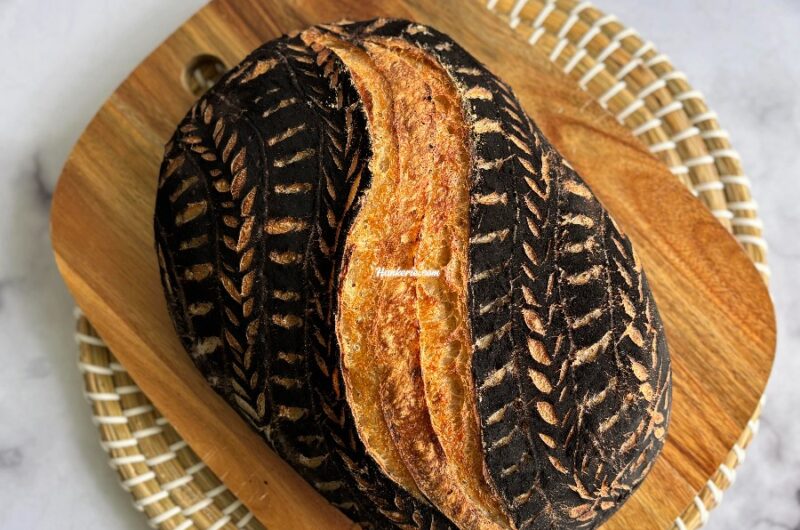
How to Score Black Cocoa Sourdough Bread Masterclass
Course: Lunch or DinnerCuisine: Sourdough BreadDifficulty: medium8
servings6
hours45
minutes400
kcalIngredients
Your prepared sourdough dough (after bulk fermentation, ready for the final coil fold)
Dried cranberries (to taste)
Flaxseeds & Poppyseeds (to taste)
Black cocoa powder (for dusting)
Rice flour or regular flour (for dusting the banneton)
Directions
- Dough Lamination (The Last Coil Fold)
- Prepare Work Surface: Lightly wet your hands and your work surface.
- Stretch Dough: Gently release your bulk-fermented sourdough dough onto the wet surface. Carefully stretch it out into a thin rectangle. Be gentle to maintain airiness.
- Add Inclusions: Sprinkle an even layer of dried cranberries, flaxseeds and Poppyseeds over approximately two-thirds of the dough surface.
- Fold:Take the un-seeded third of the dough and fold it over the middle third.
- Fold the remaining seeded third over the top, like folding a letter.
- Coil Fold: Gently pat the dough down. Perform a standard coil fold: lift the dough from the middle, allowing the ends to stretch and fold underneath. Rotate the dough and repeat on all four sides.
- Shaping and Cold Proofing
- Pre-shape and Final Shape: Pre-shape the laminated dough, let it rest briefly if needed, then perform your final shape into a batard (oval loaf).
- Prepare Banneton: Generously flour your oval banneton with rice flour or regular flour.
- Place in Banneton: Place the shaped batard SEAM-SIDE UP into the banneton. This ensures the smooth side is on top for scoring.
- Cold Proof: Cover the banneton (with a shower cap, plastic wrap, or a cloth) and place it in the refrigerator for an overnight cold proof. This develops flavour and firms the dough for easier scoring.
- Preparing for Scoring (The Next Day)
- Gather Tools: Have your scoring tools (lame, bamboo skewer), black cocoa powder, and fine sieve ready.
- Prepare Parchment: Cut a piece of baking paper large enough to hold your loaf and transfer it to the Dutch oven.
- Turn Out Dough: Gently invert the cold-proofed dough from the banneton onto the parchment paper. You should have a smooth, upward-facing surface.
- Dust with Black Cocoa: Using a fine sieve or flour duster, generously and evenly coat the entire top surface of the batard with black cocoa powder. Aim for a good, even layer to create a dark canvas.
- Creating the Wheat Stalk Design
- Sketch the Design (Bamboo Skewer):Take your bamboo skewer. Lightly etch the main lines of your wheat stalks onto the cocoa-dusted surface.
- Create a central stem for each stalk, and then add small ‘V’ shapes or chevrons branching off it to represent the grains. You can arrange them in parallel, slightly overlapping, or radiating rows.
- Sketch very lightly – these are just guidelines.
- Score the Wheat Grains (Lame):Using your bread lame with a fresh blade, hold it at a shallow angle (about 30 degrees to the surface).
- Following your sketched lines, make small, decisive, shallow cuts for the ‘V’ shapes (wheat grains). These cuts should be just deep enough to reveal the lighter dough underneath the cocoa. Take your time.
- Make the Main Expansion Score (Lame):This score is crucial for oven spring. Plan a deep ‘S’ shape or a straight/curved line that runs down the length of the loaf, weaving through or alongside your wheat stalks.
- Hold your lame at a slightly steeper angle (around 45 degrees).
- Make a confident, deep cut – about 1/4 to 1/2 inch deep – following your intended path. One good, confident slash is usually best, but you can go over it once more if you feel it wasn’t quite deep enough.
Recipe Video
Notes
- Preparation is Key:
Smooth Canvas: Ensure a smooth, upward-facing dough surface after cold proofing.
Generous Black Cocoa Dusting: Create a dark, even layer of black cocoa powder for maximum contrast. - Scoring Principles:
Sharp Lame: Use a fresh, razor-sharp blade for clean cuts.
Plan Your Design: Visualize or sketch your pattern beforehand.
Angle Matters: Shallow (30°): For surface patterns and details.
Steeper (45°): For deep expansion scores (“ear”).
Confident Cuts: Make deliberate and fluid slashes.
Experimentation Encouraged: Try different patterns and techniques. - Wheat Stalk Design Highlights:
Sketch Lightly: Use a bamboo skewer to gently outline the design.
Shallow Grain Cuts: Score the ‘V’ shapes (grains) with a shallow angle.
Deep Expansion Score: Include a deeper ‘S’ or curved slash for oven spring. - Beyond the Wheat:
Explore other designs like single slashes, parallel lines, crosses, leaves, and spirals. - Outcome:
The dark cocoa background creates a striking contrast with the lighter dough revealed by the scores.
Scoring controls oven spring and adds artistic flair.
Practice leads to better definition and more intricate designs.
Ready to move beyond the basics and truly master the art of sourdough? For 15 years, I’ve poured my passion and expertise into perfecting the classic sourdough loaf from a master baker, and now, I’m thrilled to share that journey with you in my comprehensive Classic Sourdough Bread Recipe Digital Ebook! Imagine the satisfaction of consistently baking loaves with that perfect balance of tangy flavor, chewy texture, and beautifully blistered crust – it’s all within your reach.
This isn’t just another recipe; it’s a deep dive into the techniques, tips, and secrets I’ve accumulated over a decade and a half of sourdough obsession. Whether you’re a curious beginner or a seasoned baker looking to refine your craft, this guide is your trusted companion. Unlock the secrets to consistent sourdough success and elevate your baking game today! Learn more and grab your printable ebook here ➡︎ https://hankerie.com/product/classic-sourdough-bread-recipe-digital-ebook-worldwide/
Shop our Sourdough Tools product (Available Australia-Wide) ➡︎ https://www.hankerie.com/shop
Join our Sourdough Masterclass ➡︎ https://hankerie.com/masterclass
Tools & Ingredients Used in this Recipe
Complete Beginner’s Sourdough Bread Starter Kit + Video Guides: https://hankerie.com/product/completestarterkit/
Natural Rattan Banneton: (Oval) https://hankerie.com/product/natural-rattan-oval-banneton-liner-sourdough-batard-proofing-basket/
(Round) https://hankerie.com/product/natural-rattan-round-banneton-liner-sourdough-proofing-basket/
UFO Lame set : https://hankerie.com/product/wooden-ufo-bread-lame-set-scoring-blades-pouch/
Wooden Bread Lame: https://hankerie.com/product/wooden-bread-lame-set/
Wholegrain Milling Co, Sustainable Stoneground Wholewheat Heritage Flour 5KG – Unique Flavour and Excellent Baking Properties. Wholemeal Flour, Containing the Endosperm, Bran and Germ. https://amzn.to/40WTSx7
The journey of baking and scoring black cocoa sourdough is a rewarding one. It’s a chance to connect with the fundamental elements of bread making while adding a touch of dramatic flair. So, embrace the darkness, pick up your lame, and let your creativity flourish on the beautiful obsidian canvas. The art of the score awaits.
If you’re interested to more delicious Sourdough recipe in Sourdough Discard Series, check out my Youtube Channel Playlist ➡️ https://www.youtube.com/playlist?list=PLe50YKtSlHF74ssoinkmdPf2MH17FHjKL